“Work on the models as carefully as you would on your patient’s own mouth”
Useful tips for using the ImplantBone models
Implant placement:
- Use new drills with good cutting strength, backward and forward movement and without applying continuous pressure
- Do not exceed 1000 RPM
- Do not apply too much pressure (ideally, external irrigation should be used)
- Use taps with a backward and forward movement to avoid clogging.
- Do not use self-tapping implants.
- Follow all the stages of the protocol
Taking X-rays
- The best images can be obtained with radiovisiographs at minimum power and 0.02 to 0.04 sec exposure.
Flaps and sutures
- On soft tissue or practice tablets use new blades and sharp periosteal elevators
- Use round cross-section 3-0 sutures. Do not use Nylon or fine thread
- Do not pull at the edges of the incision with the thread
- Do not overtighten the knots
Sinus lifting
- Cut a lateral window with round burs at more than 2000 RPM
- Detach the sinus mucosa with sharp periosteal elevators
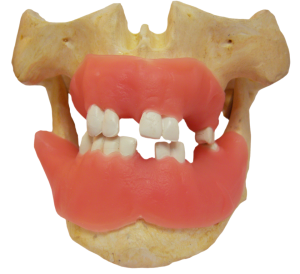
Guide to the use of the new ImplantBone models
for models with teeth series #200 # 210 # 211 # 220 # 221
MAXILLA
Implant placement
These models are prepared for the placement of single implants in anterior segment 2.1 and 2.2 on a ridge with a mild buccal plate collapse and multiple implants in the right posterior segment zone 1.4, 1.5 and 1.6 as this side has a high sinus floor.
The left side is appropriate for implant placement in the tuberosity and for sinus lifting.
Sinus lifting
The left side, zone 1.4, 1.5 and 1.6 has a low sinus floor and is ideal for practicing sinus lifting with thin lateral and inferior walls allowing a lateral or inferior procedure.
Implants may be placed in this sector following sinus bone filling with self-curing plastic material.
Practice of incisions, flaps and sutures
#210 and # 211 models with changeable gingival masks are designed for practicing simple incisions and various suture types.
These models do not have a periosteal layer and are not appropriate for split-thickness flaps. It is advisable to use #610 tablets for practicing incisions for this type of flap as they have three layers of tissue (bone, periostium and soft tissue)
Face bow recordings
All models have metal pins in the external auditory meatus for placing an arbitrary face bow and for mounting on a semi-adjustable articulator.
Jaw
Implant placement
Zone 3.1 is prepared for placing a single implant and the posterior zones for the placement of multiple implants on wide ridges.
The left segment has a crestal depression in zone 3.4.
All models have a wide ridge on the right side and radiographically visible inferior dental canal and mental foramen. In #211 and #221 clear models the canal is totally visible and the path of the starting bur and the successive burs is also visible.
Tissue regeneration procedures
The left side of the models has a ridge depression ideal for practicing tissue regeneration procedures and for placing membranes, mesh and micro-screws.
Practice of incisions, flaps and sutures
Models #210 and #211 with changeable gingival masks are designed for practicing simple incisions and various suture types.
These models do not have a periosteal layer and are not appropriate for split-thickness flaps.
It is advisable to use #610 tablets for practicing incisions for this type of flap as they have three layers of tissue (bone, periostium and soft tissue)
For models with teeth series 300 #310 #311
MAXILLA
Implant placement
These models are prepared for the placement of single implants in anterior segment 1.1 on a ridge with a mild buccal plate collapse. The right posterior segment is edentulous and has been prepared for sinus lifting procedures and for placing implants in the tuberosity. The left posterior area has a high sinus floor with narrow ridges to make surgery more difficult. In # 310 models the sinus plates are radiographically visible and in the # 311 clear series the dimensions of the sinus are clearly visible.
Sinus lifting
On the right side, zones 1.4 1.5 and 1.6 present a wide sinus and are designed for sinus lifting with thin lateral and inferior walls allowing a lateral or inferior procedure.
Implants may be placed in this sector following sinus bone filling with self-curing plastic material.
Face bow recordings
All models have metal pins in the external auditory meatus for placing an arbitrary face bow and for mounting on a semi-adjustable articulator.
JAW
Implant placement
Zone 3.1 is prepared for placing a single implant and the posterior zones for the placement of multiple implants on a wide ridge on the right side and on a thin ridge on the left side.
On the right side all models have a radiographically visible inferior dental canal and mental foramen. In #311 clear model the canal is totally visible and the path of the starting bur and the successive burs is also visible.
For edentulous series 400 #410 #420
This series of edentulous models with wide ridges has been specially designed for placing multiple implants in the anterior segment and building overdentures.
These models do not have a dental canal or changeable gingival masks.
#410 Edentulous articulated upper and lower models
#420 Edentulous jaw model
#420 Edentulous maxilla model
Downloadable documents in PDF format
Features – Our Products – Photo Gallery